Antminer S5 and S3 - Bitcoin Mining Setup
- Overview - Table of Contents
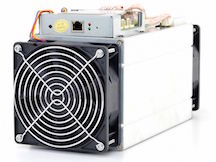
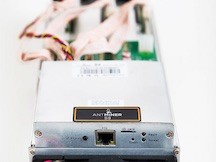
- AntMiner S5 - Unboxing Bitcoin Miner Setup with Power Supply
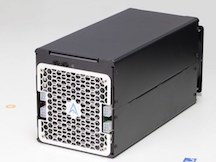
- Antminer S3 - Bitcoin Mining Setup
- How to Setup a Raspberry Pi 2 Bitcoin Mining Rig w/ Bitmain AntMiner U3
- Transcript - How to Setup an Antminer S5
- Transcript - How to Setup an Antminer S3
- Transcript - How to Setup a Raspberry Pi
The AntMiner S5 is about four times more powerful than the AntMiner S3 but otherwise they are very similiar. You can also check out the latest Antminer S7. Have you purchased an Antminer S3 Bitcoin miner and need to learn how to set it up?
AntMiner S5 - Unboxing Bitcoin Miner Setup with Power Supply
Most Bitcoin miners will need power supplies to run and they can be expensive.
Antminer S3 - Bitcoin Mining Setup
It should be pretty easy to setup your Bitcoin miner.
How to Setup a Raspberry Pi 2 Bitcoin Mining Rig w/ Bitmain AntMiner U3
Bitcoin Mining Hardware Comparison
Currently, based on (1) price per hash and (2) electrical efficiency the best Bitcoin miner options are:
Avalon6
- 3.5 Th/s
- 0.29 W/Gh
- 9.5 pounds
- No
- N/A
-

- 0.1232
Transcript - Antminer S5 - Bitcoin Mining Setup
Hello. We got a power supply here. I just got it from Newegg. That’s my power supply to my miner here. I’ll show you how to jump it real quick. Alright, so take a paper clip and you connect the green and the black wire there.
It’s pretty simple. You shove it in there – just like so and make sure it’s the green and the black and then you can take some duct tape, wrap it up, good to go – or electrical tape. And then we got the miner here, BitMiner. The pack is pretty good. So, there’s that.
Using that cord – goes in here and this then obviously goes to your modem or router whatever you’re using. And then each board here gets one cord. Not like this – like this. It’s plugged into the PCIe slots on the power supply. I’m just going to unplug this for the moment. And it’s going, got lights. It just needs to be hooked up to the internet and it’ll start running away. Done deal – that easy.
Okay, so here’s my two miners all set up going. I got two power supplies on top. They’re both the same thing. Raidmax, 80 gold, 1000 watt, four rails a piece. That’s what these things require. So, you see the temperature there, now it’s 86, oh, 76. Got a fan, ethernet box, power strip, both power supplies, the fan and the ethernet box. Doing about 1309, the wattage is 1310 for both of them, everything you see there and putting the fan on low. So that’s it, making money.
Alright, so this is the miner, it’s going about 2 hours 10 minutes, 2 hours 16 minutes and we’re updating it. See average speed, temperature is down there 48 to 50. That’s like the average miner status if you look at anything. All the other tabs are pretty much junk. There’s an advance section but, you know, it just turns it up and all you can do is create more heat. It’s not really going to hash that much faster. I actually have it bumped up to the next tier and there we go.
So, there is that one and here’s the second one. It’s going 4 days 9 minutes and it’s probably little longer 15 minutes. There’s the average speed over that time frame. And here’s temperature, you see they’re right next to each other so here we go.
Transcript - Antminer S3 - Bitcoin Mining Setup
Hey what’s up guys, this is Randall with Off The Grid Survival. This is going to be a quick video on my Bitcoin mining set up. I’m currently running three AntMiner S3 Bitcoin miners which are powered by two 750 watt power supplies. A little information on these Bitcoin miners each AntMiner S3 is generating around 450 gigahash per second which gives me a grand total of 1.35 terahashes per second.
Alright guys, so here’s the overview of the AntMiner setup. I got this set up in my spare bedroom of my house. I have it hooked up to a five-port switch, that’s seen off to the left of the screen there’s a little network switch. Three AntMiners are powered by two Corsair CX750M power supplies. And like I said right now they are just hashing away as you can hear they’re a little bit on the noisy side, but that’s expected with Bitcoin mining.
Now, one of the big questions that I’m probably going to get is how much does all these cost? Grand total I would say these cost may be around $500. These AntMiner S3s you can get a pretty good deal on ebay forum because a lot of the big AntMiner farms that are out there they’re trading in their S3s and they are upgrading to the AntMiner S5. So, you can get a great deal on these things on ebay.
Like I said, I have maybe around $500 tied into this. I used my Google Adsense Revenue which was around $330 last year to purchase a majority of these. So, I am only out of pocket maybe around $150 on these AntMiners. Overall, I’m very pleased with them. They are making money, they are doing what they’re paid to do and that is hash with a SHA256 scrypt.
Alright guys, so for more details on Bitcoin mining I am going to link a video on the description from Barnacules Nerdgasm’s channel. It’s a great video on Bitcoin mining and I’m going to link that in the description below. All right, so now you’re probably asking yourself should I start mining Bitcoins? And it’s not a cut-and-dried answer. It’s depending on where you live and what the cost of your power is where you are located. It is tactical, what you’re doing is you’re buying Bitcoins through your power bill by mining these Bitcoins. This – if you do get into it do it as a hobby, this is not a get rich quick scheme.
So now, if you do get into Bitcoin mining, the first thing that you’re going to need is a Bitcoin wallet. The website I like to use is coinbase.com. It’s basically like a Bitcoin version of Pay Pal. It’s a place where you store your Bitcoins, you could sell Bitcoins, buy Bitcoins etc.
Here’s an example of my coinbase account. Now one thing you need to be made aware of when dealing with Bitcoins is the market for Bitcoins is very volatile. It is always – there’s lots of ups and downs so that’s one thing you need to take into consideration if you want to start mining Bitcoins. Alright guys, so one last thing with the coinbase account is if you ever want to sell your Bitcoins and convert those into US dollars you can easily do so by just linking your bank account information clicking the sell button and you’ll have US currency in your account a day or two later.
Alright guys, a little bit more on my Bitcoin miners. I do have them working in a mining pool. And a mining pool is thousands of people that are working together to mine together to find a block, and a block consists of 25 bitcoins and if you find that one block the profits are split between all the people that are mining for that pool, I mean mining for that block.
So the site that I use is btcguild.com. It works out very well for me. As you can see I’m getting regular payouts of .01 Bitcoins almost daily. Some of the days where I have lapses in my Bitcoins I was swapping over to a different pool like Slush’s pool or Bitcoin Affiliate Network. And I just went back to btcguild and I’m sticking with it. Now, in closing probably one of the final questions I’m going to get is why am I Bitcoin mining – mining for Bitcoins? And why did I choose to go this route and spend this type of money?
Well, I really didn’t have that much money invested, like I said, $330 I got last year from Google Adsense Revenue which has dropped considerably ever since they switched to the Google Plus thing but I’m not going to really get into that whole aspect though because I don’t make these videos to make money. That’s just an extra part I would say. Pretty much, I like the fact that Bitcoins are not centralized to any government or corporation. It’s all decentralized.
Pretty much anything that I do with Bitcoins can be off the record. I can also take that Bitcoins, convert it into US currency and purchase silver or any type of precious metal that I want. So that’s pretty much why I mine for Bitcoins. It’s just something cool that I wanted to do. I just want to dabble in it. I really don’t have to defend the matter on why I’m doing it. I’m just doing it. So, alright guys, I hope you enjoy the video. This is Randall with Off The Grid Survival. I’m out.
Transcript - How to Setup a Raspberry Pi 2 Bitcoin Mining Rig w/ Bitmain AntMiner U3
What’s up guys? I’m Rasim from Rasmurtech.com and today I’m going to show you guys how to use a Raspberry Pi 2 to mine Bitcoin with our AntMiner U3. This is the Bitmain AntMiner U3 and this is a 60 gigahash miner this is ASIC miner. And again, we’re going to use our Raspberry Pi as the node and it’s going to control our AntMiner and we’re going to mine Bitcoin.
So, the first thing you’re going to need is a Raspberry Pi. It can be any Raspberry Pi but I’m using the Raspberry Pi 2. Now I know you guys are wondering what the hell is going on. This is a stackable case and I have four Raspberry Pis here. Now I set this up because I’m working on another video where I – where I cluster these into a cluster computer and I compare them to my other Raspberry Pi B cluster and we do speed test to compare the two so I obviously took that deal.
Now, before we can move forward we have to set this up. The way we set it up is connect the internet to your Raspberry Pi connect the other into your router. Connect via USB – this USB cord connect it to your AntMiner U3. All right. Then also, you’re going to want to connect this mini or micro USB port here to the Raspberry Pi. Then make sure that the other end is connected to a powered hub, alright, or has a powered source.
Then you’re going to connect the AntMiner’s power, this is the power for the AntMiner, right? And it should start – start up. The fans should start up and it’s powered on. You know it’s powered on because the fans are spinning. Alright, so now all we have to do is move on to the next step.
All right guys so now we’re going to set this thing up and actually get it to start mining. Remember we’re using our Raspberry Pi 2. You can use any Raspberry Pi for this tutorial. But in this tutorial I’m using my Raspberry Pi 2 and we are connecting it to the AntMiner U3 so we could start mining Bitcoin. So, we don’t need a computer. All we need is our Raspberry Pi and AntMiner U3 and we’re good to go with mining Bitcoins.
The first thing we’re going to need to do is open a puTTY and remotely access our Raspberry Pi. Now if you don’t know what puTTY is, if you don’t know how to install Raspbian I did a video where I show you guys how to do that. I’m going to leave that video in the description. It’s called the Raspberry Pi cluster supercomputer but it’s Part 2. In that video I show you how to install everything on Raspbian, how to find the IP address of your Raspberry Pi, how to install puTTY and how to remotely access it. You need to know those things first before you can watch this video.
Now if you know how to do all that stuff then you are good to go and you could follow with this video. But again, I’m going to leave the link to that video in the description.
So the first thing I want to do is open up puTTY and the IP address for my Raspberry Pi is 192.168.1.156, yours could be different. If you don’t know it you’re going to need to find out. You could find out by typing, if config in the terminal when Raspbian is loaded and it should show you your IP address. So, now we are just going to click open here and it should start, click on yes. Now it’s prompting us to enter a username. The username is Pi, hit enter and the password is raspberry, so R A S P B E R R Y, hit enter. It should start loading the Raspberry Pi.
Now the next step is to open up a web browser here and we’re going to navigate to this URL here. I’m going to leave a link to this URL in the description. But we’re going to scroll down till we get to this part here it’s by ajweller88. He created an awesome tutorial and it’s a step-by-step tutorial and we are going to get to copy the code so we don’t have to type anything. And again it’s by ajweller88 he created awesome tutorial. And in this tutorial he shows us how to set up an AntMiner U3 and get it working on a Raspberry Pi. This tutorial works on any Raspberry Pi but we’re using the Raspberry Pi 2. You can use any Raspberry Pi you want and it should work.
Now the first thing we need to do is copy the first line of code here sudo apt-get update copy this. All right. And when you get to this terminal here if you don’t know how to paste it all you have to do is right click your mouse and it should paste it automatically. Then hit enter and let it run. And now we’re going to copy the second line of code here sudo apt-get upgrade. Copy that and paste it here and then hit enter. And it should prompt you to continue with Y for yes N for no. Type Y then hit answer.
Now we are going to install dependencies. To do that, copy this code here from sudo and up until the screen here. Copy all that and paste it here, hit enter and it should prompt you to continue Y for yes N for no. Type Y hit enter. So, now we’re going to download the CG Miner that’s the mining software that will mine all the Bitcoin for us. To do that we’re going to copy this code right here git clone and up until the miner here, this whole line of code. Copy it and paste it on the terminal and hit enter.
Now we’re going to configure the CG Miner. To do that we’re going to copy this first line of code here cd cgminer. That’s going to change directory into the CG Miner directory. Copy that and paste it and hit enter. Now we’re going to copy the second line of code here sudo up until the sh here. Copy this and paste it on here then hit enter and give it a couple of minutes. When that’s finished we’re going to copy this third line of code here export LIBCURL up until this point here. Copy this and paste it on to here then hit enter. That’s done. We’re going to copy the fourth line of code here and paste it on to here, hit enter.
All right now, we’re going to copy this line of code sudo make. Copy it, paste it here and hit enter. And now everything is installed. Now we could test out whether or not it will work. Right now we’re going to actually start mining and first thing we need to do is copy this bit of code here. Now you need to fill in the blanks here. Your pool you need to – where it says pool here you need to fill it in with your pool address and where it says username you need to fill it in with your username and where it says password here you need to fill this in with your password. Right? I opened up my text document here and I pasted that onto a text document.
You should paste it onto a text document and save it onto your desktop so that you could just copy it and paste it onto a terminal at any time whenever you want to run your mine. But I replaced my pool here with my username, I’m sorry with my url. This is my pool url. I’m using slush’s pool. I replaced my user with my username. My username is rasim.worker1 and my password here is anything. If you don’t know how to download a wallet, how to join a pool and how to create workers I’m going to leave that link to the video where I show you guys all that stuff.
Now once that’s done you just copy this from your text file. Remember first thing you do is copy this here. This bit of code here and copy it and paste it in a text editor, note pad or whatever you want to do. Then paste or replace the pool with your pool address, the username with your worker name and the password with your password and then save it onto the desktop so you could just easily copy it and paste it when you need to. So, now I’m going to copy this here and I’m going to paste it.
Remember it can be filled in with your info, your pool address, your worker username and your worker password. So, now all we have to do – and when you paste this it has to be in the CG Miner directory – cd to the root directory hit enter. Now in the root directory if I paste this here and I hit enter it shouldn’t work. See, it didn’t work. So before you can paste this you’ll have to cd /home/pi/cgminer. You have to be in the CG Miner directory before you can paste this code. Once you paste this code here it’s going to start mining.
So once you hit enter it’s going to start mining for you, it should with your AntMiner U3 and remember you have to be connected to the Internet. Your AntMiner U3 has to be connected to your Raspberry Pi and if everything was done successfully you should see your AntMiner here. This is the actual AntMiner and it should start working and it’s working right now. And it’s going to give you the gigahash or megahash rate that the miner is running. Up here is how many gigahash or megahash you are running per second up here. And if you see accepted like it did here that means it’s actually mining like you’re actually making Bitcoins now or actually mining Bitcoins now. And that’s pretty much it.
So again to exit all you have to do is type in Q. Hit Q and it should shutdown. And it should go back to terminal. Remember it’s good to have this saved on any text documents. So all you have to do is just copy the code and just paste it and it should start mining. Again you have to be in the CG Miner directory. I’m going to cd back into the root directory so I’ll show you again.
So remember you have to cd /home/pi/cgminer hit enter to get back into the CG Miner directory or folder. Then you could open up your text document and copy the code that will automatically start CG Miner and start mining for you then hit enter and it should start working. It’s easier just to save in a text document. So that’s pretty much it for this part.
Right guys so that’s pretty much it for this video. If you guys like this video please give me a like. If you want more videos like this please subscribe to my channel. I’m Rasim from Rasmurtech.com and thanks for watching.