Best Ether Cloud Mining Services
There are limited options for Ether cloud mining contracts. If nothing on the list below meets your needs, you can buy Bitcoin cloud mining contracts (listed above) and simply convert the bitcoins you earn to ether.
ETHEREUM CLOUD MINING FOR DUMMIES
+_For Mac, Windows, and Linux users._
by A.Milan (github.com/angelomilan) and M.Terzi (github.com/terzim) with the precious support of @paul_bxd and @jesus666
** Warning: this has been tested on the Frontier test-net and has just recently undergone testing on the Frontier live-net, which has just been launched. A notice on costs: you are going to spend about 2.60 USD / hour for a g2.8 instance so keep this in mind, if you want to proceed **
This step by step tutorial tries to be easy to follow. It is supposed to be as easy as copy / pasting but we acknowledge that a certain level of understanding and patience to follow the detailed instructions is needed.
Even if you lack of patience, try to understand step by step what you are doing. If you do not, it does not really matter as long as you follow the instructions properly. If you have any questions, please contact @angelomilan or @terzim (github.com/terzim).
PROBLEM
I want to mine Ether, but I do not want to use my machine and I do not want to invest on new hardware and pay thousand dollar electricity bills.
SOLUTION: cloud mining aka using Amazon’s cloud servers
Since GPU mining is set to be 100x more efficient than CPU with Ethereum, we need to look to renting GPU power on the cloud. The answer, apparently, is Amazon Web services EC2.
On Ethereum forum @paul_bxd revealed an inner mean (hashrate) of 24 MH/s using an AWS g2.8xlarge instance comparable to the benchmark of an AMD Radeon R9 280x : 23.2 MH/S which is the best in class for ethereum mining (Nvidia Geforce is far less efficient)
The tutorial is divided in two parts. In the first, we are going to create an Ubuntu Linux virtual machine on Amazon Web Services (AWS) EC2 (Elastic Compute Cloud); in the second part, we are going to install Ethereum C++ miner on Ubuntu.
##Part 1 - Creating an Ubuntu Linux virtual machine on AWS EC2 (Amazon Web Services, Elastic Compute Cloud)
###Step 1 - Get an AWS account
First things first: get an AWS account here.
Amazon Web Services (AWS) is a cloud computing service provided by Amazon, the well known e-commerce giant.
Click on the top-right button:

As you can see, the registration process is very handy, since you can sign-in with your existing Amazon account. You may notice that AWS offers the EC2 service free for 750 hrs/month, for 12 months. However, that is for the Linux t2.micro instance. That is good for testing, but not for mining Ethereum. I will tell you later what instance to select to maximize the GPU power.
Once you have registered on AWS, you will be presented with a big list of the services offered by Amazon.
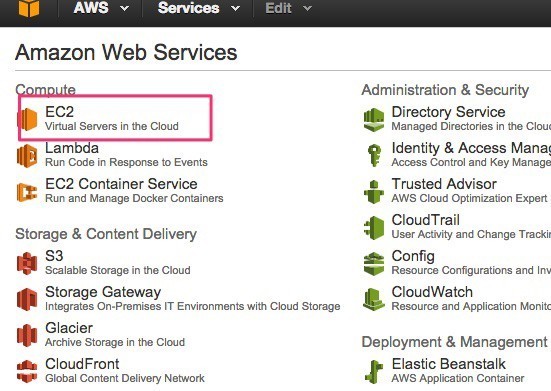
Click on EC2 (stands for, Elastic Compute Cloud), that will give you GPU horsepower for mining the Ethereum blockchain.
###Step 2 - Setup the pre-built AMI (Amazon Machine Image) on AWS EC2
An Amazon Machine Image (AMI) “provides the information required to launch an instance, which is a virtual server in the cloud”.
For our purposes, we need to use the following AMI:
- IMAGE: ami-2cbf3e44 for US-East (Ubuntu Server 14.04 LTS (HVM) – CUDA 6.5)
- STORAGE: Use at least 8 GB, 20+ GB recommended
How can we find it? To find a Linux AMI using the Images page:
- Open the Amazon EC2 console.
- From the navigation bar, select US East (N.Virginia);
- In the navigation pane, click Images -> AMIs;
- Switch to Public Images next to the search filter (the default is “Owned by Me” which will be at first empty, since you do not yet own any AMI)
- Click on the search filter and then (search by) AMI ID -> ami-2cbf3e44
Note: Make always sure you are in the correct region (US East, N.Virginia as we said) otherwise you will not see the AMI we are insterested in on the list.
The ami-2cbf3e44, like all the ubuntu 14.04 images, is supported by Ethereum Frontier, but in addition this pre-built AMI has all the NVIDIA GPU drivers, OpenCL, etc… all pre-installed.
- Select the ami-2cbf3e44 and click on the blue button, “Launch”.
###Step 3 - Customize and review your instance
Now we need to customize the instance to make sure we are doing things right.
- You will be redirected to “Step 2: Choose an Instance Type”
As we said in the intro, we need a GPU instance to mine Ethereum. If you scroll down the list you will see 2 GPU instances.
- We will go for the g2.2xlarge or g2.8xlarge (if you skip this step, you will not have an nvidia device)
- Just click on the empty box on the left to choose the instance
Note: At this point, if you want you can play with the t2.micro free instance before proceeding spending money.
-
Click on “next” and you will be redirected to “configure instance details” to access advanced settings for your instance. We suggest leaving everything as is, unless you feel extremely comfortable in what you are doing. A particularly interesting feature is the “purchasing options”: if you click on “request spot instances” you can specify the bid parameters for purchasing the computational power needed to launch your instance. Don’t overlook this feature if you want to be in control of the instance costs. As Amazon suggests: you have the option to request Spot Instances and specify the maximum price you are willing to pay per instance hour. If you bid higher than the current Spot Price, your Spot Instance is launched and will be charged at the current Spot Price. Spot Prices often are significantly lower than On-Demand prices, so using Spot Instances for flexible, interruption-tolerant applications can lower your instance costs by up to 90%. Learn more about Spot Instances: https://docs.aws.amazon.com/console/ec2/spot-instances. We want to highligth this: IF YOU ARE INTERRUPTION-TOLERANT!
-
Click on “next” and you will be redirected to the “add storage” screen. We recommend to use at least 20+ GB. Otherwise you will run out of space pretty soon! :) In any case, just do not edit these settings unless you are comfortable about what you are doing. (ask the guide creators)
-
Click on “next” and you will be redirected to the “tag instance” screen. We recommend not to edit these settings.
-
Click on “next” and you will be redirected to the “configure security group” screen. It is important that you upgrade the security settings and choose “My IP” under the tag “Source”. By doing so, only you (i.e., your IP) will be able to launch the instance. Indeed, you do not want all the internet to be able to launch your instance!!
-
We are ready, just click “Review and launch” at the bottom and “Launch” in the next screen.
###Step 4 - Launch
You will now be prompted to create your access key aka “Key pair”. To use a virtual machine we first need an access key (keep it private!). Amazon AWS access keys consist of a public key and a private key.
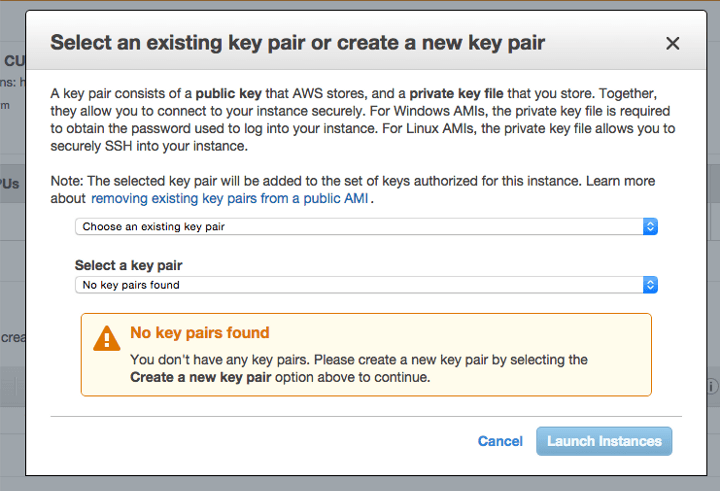
- Scroll the dropdown menu to “Create new key pair”
- Type a name for the access key
- A .pem file will be automatically downloaded to your local machine, this is your private key.
- Backup this file (for example, storing it in a USB drive) since you will need this for remote access to your virtual machine on the AWS cloud
- Then click “Launch Instances”
- All right, now on “View instances”
Your instance should be pre-selected. Wait about 5 minutes for the Initializing process. Then click connect.
###Step 5 - Connect your machine
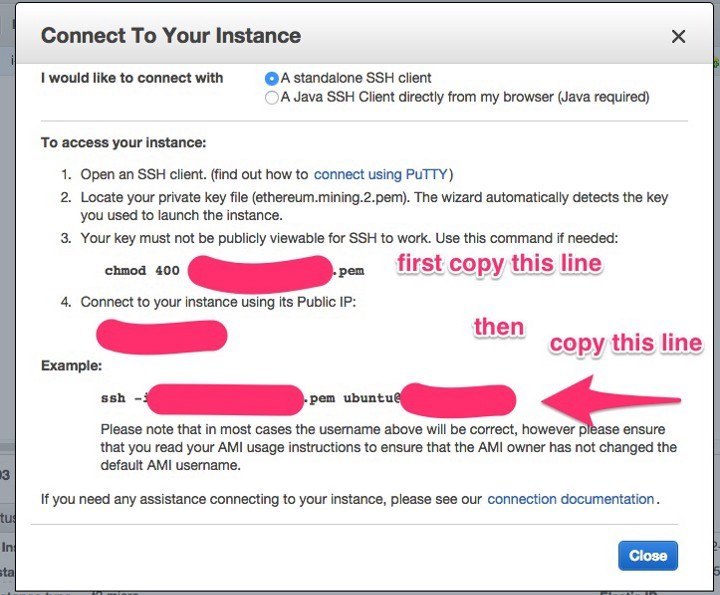
On your Mac:
- Put your .pem file in the folder Applications > Utilities
- Launch Terminal
-
Type or copy/paste
```
chmod 400 /Applications/Utilities/youraccesskeyname.pem
ssh -i /Applications/Utilities/youraccesskeyname.pem [email protected]
```
Note: You will need to use this line every time you close Terminal and want to start again
- Type yes
-
You should get a confirmation message:
Welcome to Ubuntu 14.04.1 LTS (GNU/Linux 3.13.0–37-generic x86_64)
On Windows:
To connect to your instance on Windows you will have to follow additional steps:
- Install PuTTY: Download and install PuTTY from the PuTTY download page. Be sure to install the entire suite.
- Convert your private key in .ppk format using PuTTYgen:
- Start PuTTYgen (for example, from the Start menu, click All Programs > PuTTY > PuTTYgen).
- Under Type of key to generate, select SSH-2 RSA.
- Click Load. By default, PuTTYgen displays only files with the extension .ppk. To locate your .pem file, select the option to display files of all types.
- Select your .pem file for the key pair that you specified when you launch your instance, and then click Open. Click OK to dismiss the confirmation dialog box.
- Click Save private key to save the key in the format that PuTTY can use. PuTTYgen displays a warning about saving the key without a passphrase. Click Yes. Note: A passphrase on a private key is an extra layer of protection, so even if your private key is discovered, it can’t be used without the passphrase. The downside to using a passphrase is that it makes automation harder because human intervention is needed to log on to an instance, or copy files to an instance.
- Specify the same name for the key that you used for the key pair (for example, my-key-pair). PuTTY automatically adds the .ppk file extension.
-
Your private key is now in the correct format for use with PuTTY.
- You can now connect to your instance using PuTTY’s SSH client.
- Start PuTTY (from the Start menu, click All Programs > PuTTY > PuTTY).
- In the Category pane, select Session and complete the following fields:
- In the Host Name box, enter “ubuntu@public_dns_name” . Replace public_dns_name with the public DNS for your instance, which you can view by using the EC2 console (check the Public DNS column; if this column is hidden, click the Show/Hide icon and select Public DNS).
- Under Connection type, select SSH.
- Ensure that Port is 22.
- Now you have to link your session to the private key you previously created
- In the Category pane, expand Connection, expand SSH, and then select Auth.
- Click Browse.
- Select the .ppk file that you generated for your key pair, and then click Open.
- (Optional) If you plan to start this session again later, you can save the session information for future use. Select Session in the Category tree, enter a name for the session in Saved Sessions, and then click Save.
- Click Open to start the PuTTY session.
- If this is the first time you have connected to this instance, PuTTY displays a security alert dialog box that asks whether you trust the host you are connecting to.
- Click Yes. A window opens and you are connected to your instance.
Note: If you specified a passphrase when you converted your private key to PuTTY’s format, you must provide that passphrase when you log in to the instance.
Note 2: If these steps don’t work the first time, quit PuTTY and do it again. Click here for troubleshooting
##Part 2 - Installing Ethereum on your instance and start mining
Ethereum client comes in 3 implementations. One written in Go language, another written in C++, and the third written in Phyton.
At the moment, the only implementation supporting GPU mining is the C++ implementation. However, the live testnet is running on the Go implementation (oh dear…).
Therefore, you will need the Go implementation to read, synchronize the chain and credit Ether on your account, but it is the C++ miner to have GPU support.
Anyway…
###Step 1 - Install geth (the Go-Ethereum command line client)
- Run the following commands to install the latest developer version of go-ethereum
sudo apt-get install software-properties-common
sudo add-apt-repository -y ppa:ethereum/ethereum-qt
sudo add-apt-repository -y ppa:ethereum/ethereum
sudo add-apt-repository -y ppa:ethereum/ethereum-dev
sudo apt-get update
sudo apt-get install ethereum
and type “Y” to install.
###Step 2 - Use geth to download the blockchain
Once you are satisfied with the generation of the Genesis block, you can load it into the clients using this command:
geth
This command works exclusively with the ubuntu instance we suggested. You will need to say “y” to the Ethereum agreement.
This command will also “download” the full blockchain to your cloud machine before you can start mining. That is why we recommended to get at least 20+ GB of space!
Depending on how far we went into the livenet, this could take several hours (or even a full day!). Be patient :)
- You will know that geth has finishing catching up with (i.e. downloading) the blockchain when instead of importing - say - 256 blocks at a time
Imported 256 block(s) (0 queued 0 ignored) in 449.34258ms #block_number.
…it will start importing only 1 block at a time…
Imported 1 block(s) (0 queued 0 ignored) in 3.2345ms #block_number.
Also, you can see what is the current block of the livenet by viewing the Ethereum net stats dashboard under the heading Best Block. For example, if under Best Block you have 610,002 and you reach this number in the download process, then you have finished downloading the blockchain.
- Once this process is completed, you can type ctrl+c to exit geth
###Step 3 - Install the C++ miner (ethminer)
- Install ethminer. Again, following the cpp-ethereum dev PPAs guide.
Let’s do this, assuming you have done correctly Step 1 (i.e. you have already added the PPA repository):
sudo apt-get update
sudo apt-get install cpp-ethereum
- If you get an error because you have not added the PPA repositories, do:
sudo add-apt-repository -y ppa:ethereum/ethereum-qt
sudo add-apt-repository -y ppa:ethereum/ethereum
sudo apt-get update
sudo apt-get install cpp-ethereum
Note: Do not confuse Eth (the Command Line Interface client of C++ Ethereum) and EthMiner (which is the standalone miner). Both come with the installation package but they are two different things
Note 2: If you were just testing this guide with the free micro instance you have now reached a dead end, in fact you will read this message “modprobe: ERROR: could not insert ‘nvidia’: No such device” The system is telling you that the gpu, an nvidia graphic card, is missing. So, start over the guide and get the g2.8xlarge instance before proceeding any further.
- Benchmark ethminer to check that your system is in order: (should give you your current hashrate, roughly 6MH/s)
ethminer -G -M
###Step 4 - Create a new account on geth
So, once geth has finished its synchronisation with the blockchain, you have to generate a new account. This will be your “wallet”, which will store the ether you mine. Your wallet will be stored in the hidden folder ~/.ethereum (in the /keystore subfolder). In the same folder you will find the files of the blockchain.
- To generate a new account type:
geth account new
- The system will ask for a ‘Passphrase”, aka a password. After the password is inputted (twice), you will be given an Address. Back it up in a notepad.
Note: If you lose your keys, you lose access to the account and its ether balance, permanently. Private keys cannot be generated from public ones (obviously) and the password you’re asked for when creating the account is just a means to encrypt the private key, not regenerate it. Therefore, remember your password!!!!
- You can view if the account generation was successful with
geth account list - At any time to check your Ether balance:
geth console
> web3.fromWei(eth.getBalance(eth.coinbase), "ether")
6.5
- For more information on accounts and user interaction with accounts visit the Go-ethereum Wiki - Managing Your Accounts
Step 5 - Run the syncro between the Go and C++ clients and start mining Ether (finally!)
We’re going to want both the RPC client (written in Go) and the Miner (written in C++) to run simultaneously. We also want them to run in the background so that in case we drop our SSH connection, the RPC and Miner keep running. To do that, we’re going to use a tool called screen.
First lets start the Geth RPC client
screen
geth --rpc console
Then hit control-A, then hit control-D
Now lets start the miner
screen
ethminer -G --opencl-device 0
Then hit control-A then hit control-D.
Enter screen -ls and verify that you have two detached screens running in the background. You can enter back into that screen and check the output by entering screen -x ID_OF_SCREEN. You can exit out re-detach from the screen by entering control-A, then control-D
Note: If you’re using the larger g2 instance with 4 GPUs (the 2.8) you may need to start ethminer 4 times, each time adding a –opencl-device <0..3> argument
So, you will need to start ethminer 3 more times with these commands:
ethminer -G --opencl-device 1
ethminer -G --opencl-device 2
ethminer -G --opencl-device 3
- Now you should be able to see ethminer getting work packages from geth and hopefully even “mined a block” logs in geth.
Note: If you encounter any issue or bug on this part 2 of the guide, please see the notes and comments at Stephan Tual’s GPU mining post
Q&A
Q: Ethereum blockchain sync: how long does it take to download the full blockchain?
A: You have to wait few hours, depending on the instance of your choice (one or 4 cores) and other factors.
Q: What if I quit Terminal and turn off my local computer?
Q: Do I need to leave my computer always on, can I close Terminal?
A: You should know that your new cloud machine is always working and was already “logged in”. (Unless you terminate the instance)
Next time you want to connect to your instance with Terminal and check things, you just need to type these lines:
ssh -i /Applications/Utilities/youraccesskeyname.pem [email protected]
(You don’t need to re-install the client and the miner every time.) You don’t even need to login, as you may expect.
###Step 7 - Stopping or Terminating your instance
Once you are done with your mining you have two choices:
- Stop the instance. This will shut down the instance, but makes it easy to restart it. Amazon AWS does not charge hourly usage for a stopped instance, but does charge for the storage. To stop an instance:
- In the navigation pane, click Instances, and select the instance.
- Click Actions, select Instance State, and then click Stop.
- In the confirmation dialog box, click Yes, Stop. It can take a few minutes for the instance to stop.
- To restart the stopped instance, select the instance, click Actions, select Instance State, and then click Start.
- In the confirmation dialog box, click Yes, Start. It can take a few minutes for the instance to enter the running state.
- Terminate the instance. This will stop you incurring charges, but you cannot connect to or restart an instance after you’ve terminated it. To terminate an instance:
- Open the Amazon EC2 console.
- In the navigation pane, click Instances.
- Select the instance, click Actions, select Instance State, and then click Terminate.
- Click Yes, Terminate when prompted for confirmation.
Thanks to paul_bxd of the Ethereum forum who initiated us to cloud mining with Ethereum and AWS EC2. Without his help and resources we would not be able to put this guide together.
Troubleshooting
=======
Errors
JSON-RPC error
re-generate the DAG
Failed: broken pipe/ connection timeout
(everything is stuck and you can’t connect to your instance) this can happen when you have a dynamic ip with your internet connection. Update the “my ip” solution here: https://docs.aws.amazon.com/AWSEC2/latest/UserGuide/authorizing-access-to-an-instance.html
one core of the gpu says: bus error just re-initiate the core with the command above
Special announcement
A special announcement by @paul_bxd
Now we are offering free space to host a server you buy. We can provide free power, internet and cooling. It’s 2 x more powerful than the Large GPU instance on AWS, and since AWS is $2.60 per hour you will recoup your investment in just 22 days… and own a physical miner! We ask for a % of the Ether you successfully mine. If you are interested: Signup on Remoteminer
**Contacts
If you liked this tutorial and:
- need help
- want new Ethereum “for dummies” tutorials
- want to contribute with proof reading or for upcoming tutorials
reach us on twitter or on the ethereum official forum @angelomilan, @terzim
**NEW GUIDE:
Shut up and give me ETHER (how to get ether if you are late to the party)
Upcoming tutorials:
How to monitor your AWS instance from your iPhone or Android
References:
- https://ethereum.gitbooks.io/frontier-guide/content/gpu.html
- https://forum.ethereum.org/discussion/2129/need-a-how-to-for-digitalocean-vps
- https://forum.ethereum.org/discussion/296/cloud-mining
- https://cryptorials.io/how-to-install-ethereum-frontier-video-guide/
- https://aws.amazon.com/marketplace/pp/B00JV9JBDS/ref=srh_res_product_title?ie=UTF8&sr=0-2&qid=1432036933065
- https://aws.amazon.com/marketplace/pp/B00JV9TBA6/ref=srh_res_product_title?ie=UTF8&sr=0-3&qid=1432036933065
- https://forum.ethereum.org/discussion/2165/cloud-gpu-mining-with-amazon-aws-ec2#latest